Tuesday, February 28, 2012
LEAP YEAR SALE!
The 29th of February only comes once every 4 years! To celebrate we are having a special LEAP YEAR SALE!
ONE DAY ONLY!!
9AM TO 5PM 29TH FEBRUARY 2012!
Come in to Pages 2 Scrap to receive 29% off STOREWIDE*!!
Yep that's right - 29% OFF!! What an amazing bargain!!
Don't miss this opportunity to stock up on all your favourite items and spoil yourself with that special something that you've had your eye on!
See you soon!
~The Team at Pages 2 Scrap~
*Some items exluded. Sale does not include class fees, photo processing, furniture, retreat bookings, current laybys, Vagabond Machine, Eclipse Machine, Cruicut Machines, special orders, or anything from the clearance table. Offer available on in-stock items only. No further discounts apply.
Saturday, February 25, 2012
Page 2 Girls DT Project - February - Jane Clark
Hi everyone, Jane here and this time I have some lovie dovie cards to share with you. I was tickled pink when I received my delightful Design Team kit for February, filled with yummy My Minds Eye Love Me papers, Crafty Secrets heartwarming Vintage Cuts, love love love these!! Well anything vintage really!! In the kit was also one of my favourite brand of stamps to use with my Copics - the La La Land Stamps, this cute little girl is called 'Sweetheart Marci', adorable isn't she?!

Okay for this card I stamped 'Sweetheart Marci' on blender card and coloured her with the following Copic markers - Dress: B00, B02, B04 Hair: E42, E44, E47 Hearts: R22, R17 Skin: E50, E51. The paper doily is a Martha Stewart brand, I coloured the edges with Copic R17 and the white seam binding! I love how you can use these markers to make your embellishments match in colour!! I applied Glossy Accents to the hearts and hair clips.

I love the colours of this range of My Minds Eye papers and I thought I would keep to that colour scheme, so I coloured Sweetheart Marci just a little with watercolour pencils then stamp the dress on one of the papers, cut it out and glue it over the image. I stamped the heart section of the Marci twice on cream card, cut them out and joined them together to make a concertina heart piece, added bows of cream string on each end! The banners at the top was cut from one of the papers and once again I added bows of string. The Frame was cut using a Sizzix die and black ink was applied around the inner edges.

I fell in love with this bling embellishment as soon as I saw it!! Oh my goodness I NEED to buy some the next time I'm in the shop, they're gorgeous!!! Okay...moving onto the card LOL. I create this one using one of the Martha Stewart doilies, a banner cut from one of the papers, a sentiment cut from the Vintage Cuts (did I say I love these too!! he he) , a bow of seam binding and the beautiful papers!

With so many wonderful images on the Vintage Cuts sheet it's really hard to choose which one to use!! I have no excuse to give a card for Valentines day now! I think I could even give a wonderful friend any one of these card, don't you think? I created a little collage of embellishments under the image using a red bloomer, trimmed banner, postage image (from Vintage Cuts), white seam binding and a tiny white flower.
Well I hope I have got you in the mood of love and wanting to create some cards for the special people in your life, why not create a card for your Mum, sister, daughter?
Thanks again for looking, happy Valentine xx
Friday, February 24, 2012
Textured Impressions Card Class.
Hi everyone!
I'm finally back in the classroom this month after a bit of a break for the last couple of months!
I'm here today to tell you about my upcoming cards class that's on TOMORROW and this coming Wednesday!
Textured Impressions Cards.

$30.00 (includes kit).
In this class you will make 4 gorgeous cards suitable for any occasion using the new Stamp & Emboss Textured Impressions set from Sizzix & Hero Arts.
This class will feature stamping, heat embossing, dry embossing (with the Cuttlebug) and lots of inking.
Dates:
(Why not stay on afterwards for our Scrap & Pizza Night?!).
OR
To book over the phone please call 1300 664 228 or follow the links above to book online. :)
I really hope to see you there!
~Sarah S~
Wednesday, February 22, 2012
Special discount on Distress inks for Members only!
MEMBERS ONLY SPECIAL!

From now until midnight Saturday 25th February 2012 members only can get Tim Holtz Distress Inks for only $9.99!
What a great opportunity to stock up on those colours that you don't have yet!
All 36 colours are available (as well as the clear embossing ink) - so rush in quick to get them at this great price!
REMINDER!! Our monthly scrap night is on this Saturday from 6pm so the store will be open until Midnight for your shopping pleasure! It is our first Scrap & Pizza night of the year, so why not get your friends together and come along for a great night of scrapping and chatting! Booking in is easy - just call us on 1300 664 228 or you can book online here!
We hope to see you soon!
~The Team at Pages 2 Scrap~
Tuesday, February 21, 2012
Page 2 Girls DT Project - February - Jennifer
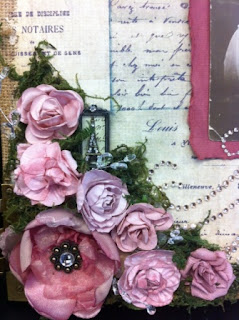
“L....O....V....E”.... Altered Book
When I saw the papers for my second DT challenge I was so excited! I have long wanted to do and altered mini and the vintage papers were perfect for what I wanted to do!
I took off to a second hand book shop to purchase an old Readerʼs Digest (must have a Hardcover) which only set me back $1.10.
Then I got to work on it!
Hereʼs what you will need for this project......
My Mindʼs Eye “Love Me” Banners, Stamped, and Doily Banners,
Pomegranate Splash Bazzil Cardstock
Vintage Photo Ink pad
Tim Holtz “Love” Stamp
Seam Binding
Martha Doily
Heartwarming Valentine Love
Vintaj
Kaiser Bloom Resin
Gesso
Paint in mustard or yellow ochre
Mod Podge
Glimmer Mist in Rock Candy, Olive Vine and Santa Baby
Rock Candy Stickles
Assorted embellishments and bling
1. First of all you will need to brush the cover of your book with gesso, whilst it is still dry, get a bit of the yellow ochre paint on the end of your brush and go over the gesso, mixing it in as you go but leaving it somewhat streaky. Cover the entire book in this way, front, back and spine. Allow to dry....I used my heat gun to accelerate the process since I am so impatient!
2. Repeat Step 1.
3. Once dry, Get your vintage photo ink pad and rub it all over the book. The ink will catch on some parts and leave others bare, this is exactly what you want! Allow to dry. Repeat, focussing mainly on the edges of the book.
4. At this point you should decide how you will decorate your book cover, I wanted to have a page from inside the book on the cover, so I tore a piece out of the middle of the book, tore it roughly into a
square shape and inked the edges, I crumpled into a ball and smoothed it out and rubbed it over with Vintage Photo, then glued it where I wanted on the cover. I used the same technique to make the green leaves on the cover, but I glimmer misted them with olive vine and allowed them to dry before gluing. Once they were dry (again I love that heat gun!) I sealed the entire book with a coat of mod podge. Allowed to dry and repeated twice more for that aged, well thumbed patina. Then I used the crumple, ink and glimmer mist technique to make the heart again with the paper from inside the book. I used Santa Baby glimmer mist for this. Once dry I used my Versa Marker Stamp Pad to stamp the TH Love stamp on it, sprinkled it with gold embossing powder and embossed it.
5. I used the pomegranate splash to make the cool, blingy rose you see on the cover. I used the TH Tattered flowers die, and cut it in the three sizes (not the daisy shape but all the rest) making two of each out of the pomegranate cardstock. I love the colour of this one! First I inked (with what else?.....vintage photo of course!) and pinched the ends of the petals to give that rose petal look, then I
cut along the edge of one of the petals into the middle and overlapped two of the petals to make the flower slightly cone shaped and glued it in place (I used glossy accents for this). I did this to all the pieces. After that I just stacked them into each other, cutting the bottom of the two smaller ones to make them nestle down nicely. I pushed a blingy brad through the two smallest ones and arranged the flower how I wanted it, then I glued all the layers together with hot glue. Once the glue set, I set about bending all the petals to give a realistic look until I was happy with the finished flower. At this point, I covered every little bit of the flower with rock candy stickles to give it that cool irridescent finish.
6. O.K. For the smaller flowers on either side I made paper bag flowers. These look amazing! I simplysprayed them with glimmer mist unevenly and dabbed gold paint here and there using this tute:
http://www.youtube.com/watch?v=UHy9xEK8eww
7. The tiny red flower at the bottom left hand corner was made using the smallet die cut on the TH tattered flowers die, I just pinched, inked and cut along one petal to overlap and make cone shaped the same as all the other pieces, then I covered it with stickles and pressed a bling in the middle.
8. The tiny red rose was made by hand using a scallop edged die and the same techniques I used for the large rose. The two blue flowers on the page are the resin flowers from P2S, the doily under the rose is the Martha Stewart doily. I also added bling randomly and the cute butterfly from P2S, ask the girls....theyʼll know which one it is!
9. The little bird in a cage is the Th one (of course!) I cut it out of chipboard, painted it white roughly to make sure some of the chipboard still showed through and added crackle glaze, the birdy is painted blue, stamped with a sheet music stamp (kaisercraft) and has a small black bling eye. The perch is just
inked with....yup.....vintage photo! Where the holes were I have added pearl and rhinestone bling.
10. For the cool green silk look alike “ribbon” tying the book closed I simply cut off some seam binding, Glimmer misted it in olive vine and allowed to dry. I then used a craft knife to slit open the inside lining paper of the book (inside the cover) and squeezed in some glue, then I pushed in the binding, a bit more glue and smoothed the paper back down....presto! I added a little heart charm to the bottom and a lock charm right at the top near the book edge.
11. For the inside all I did was glue all the pages together into stacks about 1cm thick, making sure I didnʼt glue right to the loose edge, then tore out about 1cm thick stacks a couple of pages at a time, trying to keep it neat looking. This is so you can add 3D decorations later on and the book can accommodate additions.
12. Once the pages are glued, you can happily rip away at the edges, tearing uneven strips to give the book pages that grungy vintage look, then I rubbed vintage photo onto all the torn edges and right around the page edges. I painted all the pages with Gesso, then closed the book and applied pressure allowing the gesso to stick some of the pages together, then I went and peeled them back apart to give that torn and weathered look to the pages. Once dry, just rub each page lightly with vintage photo the ink will seep in more where the paper is torn and exposed than where the gesso is, giving it a worn and aged look. Then glimmer mist each page with caramel apple or another brownish looking glimmer mist. You can also use rock candy GM.
To decorate the inside all I did was tear each of the papers to make mats, pockets and heart shapes, ink
them and glue them in adding flowers, brads, butterflies and bling and the lovely P2S vintage stickers along the way.


I hope you have as much fun with this project as I did!
~Jennifer~
Friday, February 17, 2012
Pages 2 Girls DT Project- February- Kate
Hi everyone!
It's Kate here and it's February already, I can't believe it.
In keeping with the theme of the month of LOVE, I have created two layouts to hopefully inspire you to celebrate the ones you ADORE in life.
I was really excited to receive this kit to play with. Such a contrast to the fun masculine retro kit from January, I couldn't wait to get stuck into this kit of reds, pinks, and pretty turquoise.
LOVE BIRDS

This is a double 12x12 layout I have put together. My best Canadian friend in the world had these romantic engagement photos done and I thought they were a perfect reflection of love.
First off I used some Kaiser paint on the cardstock base. I found the white paint really broke up the red and added a bit of texture and contrast. Gesso would be great for this as well.
I used strips of paper and Collections tissue paper at the bottom of the base and then lined and overlapped the photos across the page. I added clusters to each end, cut a Martha Stewart Doily in half and attached to the top and ties a ribbon bow for the bottom. Cutting individual Blommers trim pieces to add to the clusters makes that trim go even further!
- Kaiser paint
- Bazzill cardstock- Pomegranate Splash
- My Minds Eye Love Me Patterned Papers
- Heartwarming Valentine Love Stickers
- Blommers Trim Berry
- Kaiser blooms resin
- Martha Doily
- Kaiser back ground stamp
- Kaiser rhinestones
- Prima paper flowers
- Seam binding
- Collections tissue paper
- Vintaj
- Glimmer mist

LOVE WISH DREAM

This single 12x12 layout was created with the inspiration from the photo of my 21 year old niece at the beach.The colours were just a perfect match, and I really wanted to make a fun, young feminine type page. Doodling is perfect for adding that extra 'fun' to a layout, as it reflects carefree!!
Using my trimmer I was able to add a bit of interest to the base of my layout by cutting a frame and then a smaller square from the remaining paper. In between them both, i used a paintbrush dipped in glimmermist to add a 'watery' type impression on the page (since she is at the beach and all). And the giant ribbon rose is simple enough to make by layering it around and around - adhered with a hot glue gun and a gorgeous Kaiser resin flower in the centre.
- Bazzill cardstock- white
- glimmermist
- Blommers trim berry
- Love wish dream stamp
- martha doily
- Kaiser bloom resin
- my minds eye love me patterned papers
- Heartwarming Valentine Love stickers
- Prima paper flowers
- Kaiser rhinestones
- Satin ribbon
- gold brad
- Kaiser paint

I hope my layouts have inspired you this month, be sure to check out all the Design Team's projects in store on the Design Team wall display. But in the meantime, leave me a comment here so I know you have dropped by.
Love Kate xo
Wednesday, February 15, 2012
Please welcome Samantha to our team!
It is with great pleasure that we introduce the newest member of our Pages 2 Scrap team - Samantha!

Sam has joined us as a Retail Assistant, so next time you're in store be sure to say hello!
Sam has been busy in her scrap room and has created the most gorgeous canvas honouring her great grandmother. She started with this Tim Holtz District Market Burlap Panel canvas:

And created this stunning piece of art:

Isn't it stunning!
Sam has used gorgeous flowers and trinkets from Prima, as well as flowers and bling from Kaisercraft......
.....along with fabulous metal embellishments from 7gypsies and Tim Holtz's Idea-ology line:


Also note the hand dyed seam binding and the Twiddleybitz chipboard name plate. Gorgeous!
All products for this project are available at Pages 2 Scrap. See you in store soon!
~The team at Pages 2 Scrap~

Sam has joined us as a Retail Assistant, so next time you're in store be sure to say hello!
Sam has been busy in her scrap room and has created the most gorgeous canvas honouring her great grandmother. She started with this Tim Holtz District Market Burlap Panel canvas:

And created this stunning piece of art:

Isn't it stunning!
Sam has used gorgeous flowers and trinkets from Prima, as well as flowers and bling from Kaisercraft......

.....along with fabulous metal embellishments from 7gypsies and Tim Holtz's Idea-ology line:


Also note the hand dyed seam binding and the Twiddleybitz chipboard name plate. Gorgeous!
All products for this project are available at Pages 2 Scrap. See you in store soon!
~The team at Pages 2 Scrap~
Tuesday, February 14, 2012
TEACHERS WANTED!
Do you have a passion for Scrapbooking that you 'd like to share? Do you love creating with new techniques, and staying on top of the trends and latest releases?
If this sounds like you then we'd love to hear from you because we would love to add some fresh new teachers to our family at Pages 2 Scrap!
Successful applicants will meet the following criteria:
- Must have previous teaching experience.
- Must be able to meet deadlines.
- Available on Saturdays and/or weekdays.
If you are interested, please email 3 examples of your recent work (jpgs please), along with a little bit about yourself and your teaching experience to Sarah at store@pages2scrap.com.au by 5pm Saturday 25th February 2012.
We look forward to hearing from you!
~The Team at Pages 2 Scrap~
Monday, February 13, 2012
Page 2 Girls DT Project - February - Fiona
What a joy to create with this beautiful range of papers! Let's get started shall we?


Card #1 “Happy Valentine’s Day”

Cut Kraft cardstock 5 3/4” x 3 ¾” & stamp Unity Marah Love in Archival Black Ink at the centre top. Trim off the top 1 ¼” of cardstock up to the design. Round the bottom corners & set aside (this is the insert). Cut Pomegranate Splash Bazzill 4” x 9 ½”, score halfway on the long side & fold to make your card base, then round the bottom corners and set aside. Cut MME Love Me ‘Stamped’ paper (words) to 3 7/8” x 3 ¼”, and cut MME Love Me ‘Banners’ (dots) to 3 7/8” x 1 3/8” and round the bottom corners of the dot piece. Cut Pomegranate Splash Bazzill 3 7/8” x 5/8” and stamp ‘happy valentine’s day’ from Darkroom Door All Occasions stamps in Archival Black Ink to the right side of this strip, and edge the top and bottom in black ink also. Trim Martha Stewart Doily to 2 equal pieces and colour with Tattered Rose & Victorian Velvet Distress Ink. Attach one to the bottom left edge of the word paper & one to the top left section of the dot paper, then attach the greeting strip evenly over both sections to join them.

Using the insert as a guide (that you prepared earlier), stamp Unity Marah Love over the word paper and trim out that section generously, then use a sewing machine to stitch around the edge & the top and bottom edges of the greeting strip. Place this front panel on the card base and trim the base to match the front panel, leaving a small gap. Adhere front panel to card front, and adhere the Diamante Trim on the left of the greeting panel. Attach the insert to the inside of the card with the stamp protruding through the trimmed front panel section.
Card #2 “Happy Anniversary”

Cut Pomegranate Splash Bazzill to 6” x 8”, score the long side half way, fold and set aside (base). Cut Kraft cardstock to 6” x 4”. Cut MME Love Me ‘Stamped’ paper (vintage images) to 6” x 2 7/8”. Cut Pomegranate Splash Bazzill to 6” x ½” and edge with Aged Mahogany Distress Ink. Lightly draw a pencil line about 2 ¾” from the base of your Kraft cardstock, then, using this line as a guide, use Frost White Colorbox Ink to stamp the top section of Unity Marah Love repeatedly across the cardstock. Edge the Kraft cardstock with Vintage Photo Distress Ink and machine stitch around the top section (roughly above the line). Drag the Frost White Colorbox Ink across the vintage image paper to lighten the black images and edge with Vintage Photo Distress Ink. Attach the pink strip behind the top of this piece leaving about 1/8” protruding, then attach this layer to the bottom of the Kraft cardstock, then machine stitch around the bottom section also. Attach this whole front panel to the card base.

Colour a Martha Steward Doily using Victorian Velvet, Barn Door and Aged Mahogany Distress Inks. Attach the doily and the Crafty Secrets Vintage Cut to the card, and add some Kaisercraft Rhinestones around the doily. Wrap some twine around card front, add a little ribbon & a piece of Blommers Berry coloured Trim. Stamp ‘Happy Anniversary’ from Darkroom Door All Occasions stamps in Vintage Photo Distress Ink on Kraft cardstock, trim out and edge in the same ink and attach to card.
Card #3 “XO I love you”

Cut Raven Bazzill to 4” x 9”, score the long side half way, fold and set aside (base). Cut MME Love Me ‘Doily Banners’ paper (hearts) to 3 7/8” x 4 3/8” and drag the edges generously across Victorian Velvet Distress Ink pad. Cut Pomegranate Splash Bazzill to 2 ½” x 1 ¼”, score the long side half way, fold and corner punch the folded corners. Stamp ‘i love you’ from Darkroom Door Hearts stamps in Black Archival Ink toward the fold side of the tab. Attach tab to the top right of the card base, then attach the heart paper to the front of the card base and sew over where the tab attaches.
Cut out an ‘X’ and ‘O’ from Raven Bazzill and attach to card front (I used a computer font to generate this, but you could easy just hand draw them). Use a black marker to ‘draw’ a stitching line around your letters.
ATC “Love Kiss”

Cut White Bazzill to 2 ½” x 3 ½” and colour using Pumice Stone and Black Soot Distress Ink and a blending tool. Stamp Unity Marah Love in Pumice Stone Distress Ink on the bottom half (stamp it on scrap paper first to remove some of the intensity of the ink) and stamp it a second time on the top half using Aged Mahogany Distress Ink. Cut out the Crafty Secrets Vintage Cut and mount it on a small piece of Raven Bazzill and attach to bottom left of ATC. Stamp ‘i love you’ from Darkroom Door All Occasions stamps once in full, and once nearly all off the edge of the ATC using Black Archival Ink. Drag the edges of the ATC across Black Soot Distress Ink pad to finish.
Tag Set
All tags are made the same way.

Use Unity Marah Love stamp and apply your chosen Distress Ink colour with an ink blender tool on Kraft cardstock, then apply some Black Soot Distress Ink around the edges in the same manner. Repeat until you have the desired number of tags. I used a tag shape as a template to ensure all my tags were the same shape. Trim out the tags and around the bottom of the stamped image.

Apply matching Distress ink to a circle of Kraft cardstock and attach to top of tag and punch a hole through the middle. Apply matching Distress Ink to a small piece of Seam Binding by squashing the ink pad to a craft sheet with some spritzes of water, and drying carefully with a heat tool.
Fiona
Fiona
Saturday, February 11, 2012
40% OFF KAISERCRAFT BEYOND THE PAGE ITEMS!
Tracey and Sarah have returned from CHA in
Anaheim, California, where they've ordered lots of gorgeous
new products from major brands such as Prima, Basic Grey, and Ranger -
just to name a few! We have so much new stuff on the way that we need to make
room for it so we're having a sale!
From now until 5pm Wednesday 29th
February 2012 come in to receive:
40% off ALL KAISER BEYOND THE
PAGE WOODEN ITEMS!

Yep - 40% off our entire selection of Kaiser wooden beyond the page items - perfect to make as gifts or to display in your home!
We have a huge selection available -
definitely something for everyone! So pop in and grab yourself a bargain before
it's all gone!
See you in store soon!
~The Team at Pages 2 Scrap~
* This offer is
available from now until 5pm Wednesday 29th February 2012, on Kaisercraft
beyond the page wooden items only. Only while stocks last, on items that are in
stock only. Offer does not apply to special orders. No further discounts apply.
Subscribe to:
Posts (Atom)